 Start out with your favorite cookie dough. Separate into 6 parts. NOT EQUAL, small to large  Use the 6 colors of the rainbow. Color the largest section in red and follow the colors of the rainbow in descending order. Roll the violet into a log. Set in freezer about 5 minutes  I am showing how I keep the colors from staining my hand. If you notice there is yellow on the paddle. If you mix the dough in descending order starting with red, a little on the paddle won't hurt. Then you don't have to dirty 6 bowls. If the dough sticks too much, add a little flour so it has the consistency of playdough.  Roll out dough between parchment paper so it doesn't stick to your counter.  wrap each color around the log. If it's too long, cut off the end and add it to the length.  Seal the seam.  Continue with all the colors in order. Now you can see why each color clump of dough needed to be larger than the previous one.  If the dough doesn't reach, pinch together.  Here's an example of rearranging the dough to make it fit around the log.  last layer  roll log in parchment paper (or waxed paper) and freeze for about 20 min. or you can even refrigerate overnight.  When you are ready to slice, I like to have a wet washcloth handy. I wipe my knife on after each slice. You can cut into any thickness you want. I suggest 3/8-1/2 in. thickness  Notice how the sliced one is a little lopsided. Just squeeze together to make a circle shape  Here is an example of a circle I baked and cut right after taking out of the oven. and one that I cut before baking. Notice how it keeps it's shape better if you bake first then cut while it's still hot.  this is why you need to make sure the dough is cold. If you slice too early the colors bleed into each other. The one on the right was sliced without refrigeration. And that's how it baked. NOTE: Bake on parchment paper so cookies won't stick. Just slide paper off and they will keep their shape  You can frost a cloud cookie, add a pot of gold for St. Pat's day or just serve the rainbow cookies as is. Enjoy!! It takes about 1- 1 1/2 hours. Makes a fun babysitting project too!!!
1 Comment
Wow, I thought I would be able to sit down an write, write, write when I decided to start this blog. I have so many ideas spinning in my head. I started a business facebook page last month, and the snowbirds have returned to Sarasota. People are getting married every weekend and there are not enough hours in the day to do everything on my list. I've hired 2 new people and they are wonderful, Brie and Judy. But, we have so much baking to do, it's hard to find time to come to the computer and share with you.
I became a Girl Scout leader over the last month as well. This will fill a void for me. I miss having kids in my house. This week we are trying out fun Halloween treats to sell in the store and to hand out during our Fourth Friday at the Village. One thing I learned is that no one down here has ever heard of "poke" cake. It's where you poke the cupcakes with a fork and fill with jello. It keeps them so moist. Just use half the water and let cool a little before pouring over the holes. If the jello starts setting though, you've waited too long. This week we are using orange jello and adding orange extract to the frosting, along with grated orange zest to make it orangey Oh my, blogging is such a new thing for me, I need to remember to get TO IT.
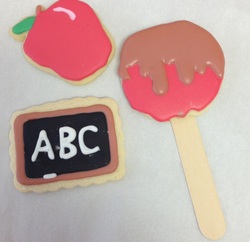
Well, it's back to school for the kiddos, which means they'll be HUNGRY when they get home. As much as I liked to make crafts with our snacks and got all excited about making something, sometimes the kids just WANTED TO EAT. But, at least I was prepared for the snow days and rainy weekends. Since I liked to be in the kitchen, I always had something for the kids to do with food. And we liked making homemade gifts for the teacher when we could. It's a little different now with all the food allergies and limitations on what you can take to school, but there's always Grandma or the babysitter to make an edible gift for. Unfortunately, when my computer crashed back in 1999, I lost all my pictures and we didn't have the Geek Squad to run to so I may not have photos to post right now. Hopefully, I can explain well enough to give you an idea. First, if you haven't signed up with Pinterest, I encourage you to do so. Everything I talk about is on there by now. You can see pictures and get recipes. I'm just here to get you excited about getting your kitchen messy. September 5 is Teachers Day. Since I used to be a teacher i looked forward to the luncheons, the cards, and the special notes I received from the families. I got a lot of homemade gifts and cookies and enjoyed every single one of them. One of the things I had my kids make were caramel apple cookies. Very simple. Make your favorite cookie dough for cut-outs. Dye your dough red (or frost it red, yellow or green later)Insert a wide craft stick in the cookie before you bake it. Once it's cooled, drizzle frosting on the top to look like caramel dripping on the apple. To make a glaze that hardens, mix equal parts white corn syrup with water, add food coloring, vanilla flavoring or any flavor you like, and powdered sugar until you get the consistency you want. Ta-dah. Let dry overnight and bag the next day. Picture coming tomorrow. Another fun cookie is a chalkboard. Frost a rectangle with black frosting. Out line in brown. Write the teacher's name in white. When dry, you can even smear some powdered sugar to make it look like chalk dust. Picture coming tomorrow as well. Call or email me if you ever have questions. I love helping people. I get asked sometimes why I show people how to do what i do. Well, either they are like me, and want to learn the tricks because they want to do what i do, or as my daughter tolthey see how much work it can be and become a repeat customer! ha ha  The Cookie Cottage - Interior The Cookie Cottage - Interior My dream is a reality! The Cookie Cottage is open starting tomorrow! My dream came true! Still getting countertops built behind the bakery case. And need to hang photos and signs on the wall. AND tear off the plastic covering on my case. I'm really excited about finally having a place to hold my classes!!! I look forward to seeing you at the Cookie Cottage where you'll enjoy "creative cookies for any occasion". Please join me for my grand opening/ribbon cutting with the chamber of commerce on June 28th, 5-9 pm. After moving to higher humidity, lower altitude and having different brands of ingredients available, I've had to do a lot of experimenting with my recipes. However, turning them into fun edible crafts is still the same. If you're still looking for something fun to do for the Fourth of July, I'd like to show you a simple cookie project.
I always think of watermelon feeds and picnics around Independence Day so here is something I like to do around the fourth. Watermelon crispy rice treats and watermelon cookies. However, at the moment my site is not loading pictures. I will upload asap For the crispy treats, make two batches of crispy rice mixture. (Mix 40 marshmallows with 3 T melted butter so they are all coated. Microwave for 90 sec.) While stirring add food coloring. One batch green and one batch red. Each batch gets 6 cups of crispy rice cereal. After mixing you may want to let it sit for awhile so it is not as sticky to work with. Take the green batch and press along the outside of a round cake pan into a ring. Then I like to add brown mini M&M's to the red batch and press that inside the green ring. After it has cooled, I slice and put in baggies right away to seal in the freshness. That's all there is to it. Children love this simple activity which looks like it took all day. For the cookies, use your favorite cut-out cookie dough and add red food coloring. Roll out and cut with a circle cookie cutter in the size that you want. If you don't have any cookie cutters, use a drinking glass. Then cut the circle in half. Before baking, have the children place mini chocolate chips on top. After you've baked them and they are cooled, mix up green flow frosting (powdered sugar, water, vanilla works just fine) It should be the consistency of a thick syrup. Have the kids dip the bottom edges in the frosting and lay out on waxed paper to dry. You can just frost the top but the kids really enjoy the dipping. Pictures coming soon!! |
AuthorCathy Vande Mheen Archives
February 2014
Categories |


 RSS Feed
